PHOTOGRAPHY EXPOSED
by John Peters A.R.P.S.
COMPOSITION
What is composition? Its the arrangement of elements with a frame and composition can greatly affect the appearance of your image. In photography, we always strive for a balanced image too. Composition is a vast subject and will always be king for me. Composition is all around us, in most things. It pays to look at paintings, drawings, magazines etc., pick up tips, study the old masters, absorb composition when you can. Use composition to improve your photography before expanding your gear. This article is more geared towards landscape photography but can be applied to other types of photography.
I want you to think of taking a photograph, think of it as a bit like a recipe, baking a cake for example.
Taking any photograph could be viewed as a process, a pre-determined set of procedures for success. Look on FACE (check 'F') as the ingredients, commom to all recipes for cakes. Look on ETOILE (check 'E') as the process or technique common to all cake baking. Look on editing as the presentation of your cake. A basic cake, sat on a plate or tin is not very appealing. To get the best presentation you should be prepared to make the most of your cake or in our case, a photograph. Liken good presentation to EDITING (Check under 'E').
There you have it, FACE, ETOILE, EDITING, the ingredients, the process and finally, the presentation. 'Simples'. Please note that ETOILE can also be used when taking an image. Try to meet as many points as you can in ETOILE and if your image satisfys many categories, you may have a potential winner on your hands.
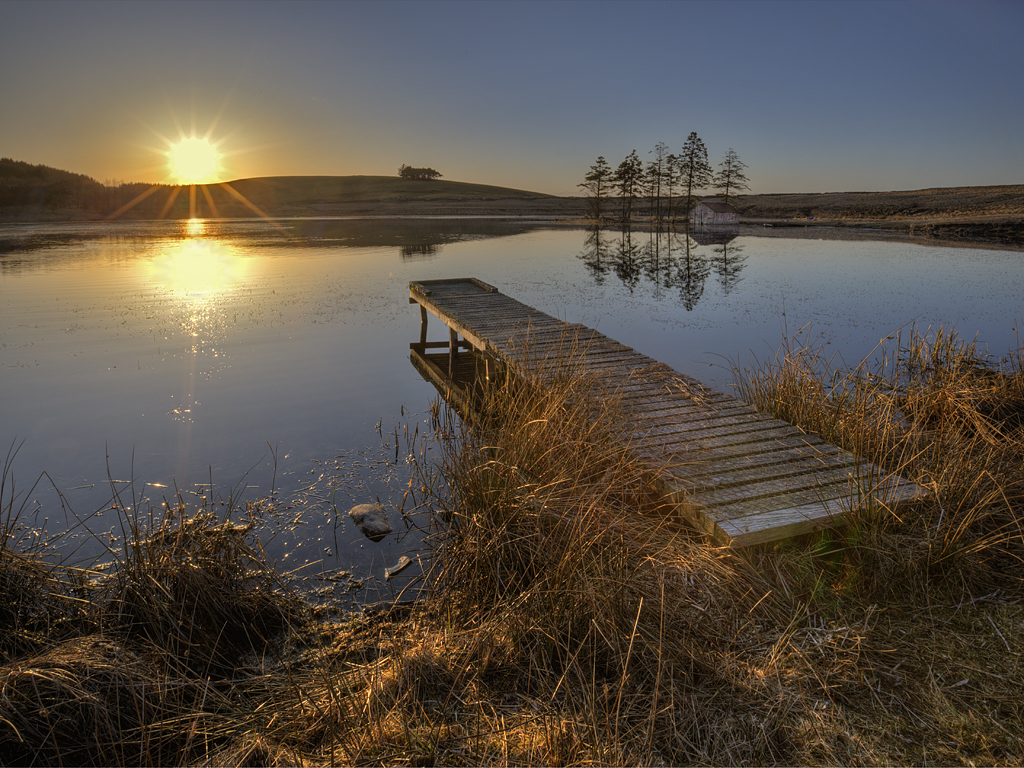
One of my favourite landscape photographs relying strongly on good composition and quality lighting. Photographed as the sun was setting on a cold, frosty day. Helped by HDR processing and my EB method, we have some detail/colour, even when shooting directly into the sun. Contra-jour or backlighting, is my favourite technique and spawned the need for my E.B. method. Give it a go, liven up your photos.
How many compositional elements can you spot? Leading lines of the wooden platform taking your eye into the photo, the low, oblique lighting giving texture and back-lighting to the foreground grass and rushes, reflections, general colour harmony, a well balanced photo, colour in the sun. Please check LIGHTING for advice on quality lighting and my EXTREME BRACKETING (EB) method. This is an example of advanced photography, beginners should not feel swamped as in their early days, simpler techniques bring many rewards. Lighting or to be more precise, the quality of the lighting is critical for a photograph to have a good chance of being succesful.
COMPOSITION IS KING
'Composition is King' as far as I'm concerned and is almost always applied in my style of photography. Learn the rules of composition before you consider breaking them, good advice I read early on in my photography. It should be noted however that one photographer who is quite famous said 'Photography is not a sport, there are no rules in photography.'
TOP TIP For a good photograph, include a few elements of composition in your photographs, the more the better, and it will become a habit, second nature. When taking a landscape, move around, change position, get some height, check your view from low down.
Do all the viewpoint / compositional checks with the camera at your eye before you mount and secure it on a tripod before taking a photograph.
TOP TIP For a good photograph, remember your checks and pre-photograph processes. F.A.C.E., E.T.O.I.L.E., E.B., especially if you feel your scene or subject has the potential of being a good photograph. Bracket for H.D.R. or just to make certain one of your photos is taken at the best exposure.
EFFECTS ON COMPOSITION
As I've said already, Depth Of Field or DOF is controlled by the aperture you set. I like to regard that more as a compositional or technical adjustment made to bring about a particular amount of DOF other than a simple means of making an adjustment purely for exposure. Motion blur or freezing the action is controlled by the shutter speed your camera is set to. I like to regard that more as a compositional or technical adjustment made to bring about a particular amount of motion-blur other than a simple means of making an adjustment purely for exposure.
BEGINNERS for now, forget about DOF and motion blur. These will both be covered in detail elsewhere on this website. Just treat aperture and shutter-speed adjustment as a simple means of altering the exposure by letting more light reach the sensor, or by reducing the amount of light hitting the sensor.
THE TOOLS OF COMPOSITION
I tend to encourage beginners in photography to try and include a few simple elements of composition such as:
leading lines
rule of thirds
natural framing
giving a moving object space to move into
and always, watch your background.
Be wary of branches or poles 'growing' out of someones head. Balance is important too, don't always place things dead center in your frame, and for landscapes, include about 2/3 land, 1/3 sky or vica-versa. Talking of skies, try and make sure you include an interesting sky with clouds or a flock of birds, something that adds more detail to the sky area. By the way, leading lines, rule of thirds etc., are all explained in more detail, with examples.
A beginner has enough to grasp and if you're trying to thrust on them the exposure triangle, exposure itself, DOF and motion blur, as well as components of composition, it's little wonder photography can sometimes appear as a technical and confusing subject.
Think about it. Is motion blur or freezing an object, a compositional or techniqual adjustment to improve a photograph or are they used purely for adjustments to the overall exposure? Depth of Field or DOF controlled by the aperture you set, is that a compositional or technical tool or purely an adjustment to exposure? Remember, there is no such thing as one correct exposure. In my opinion, aperture and shutter-speed offer two of the most influencial compositional or technical tools available for us to influence the appearance of an image, to give that professional look to our images.
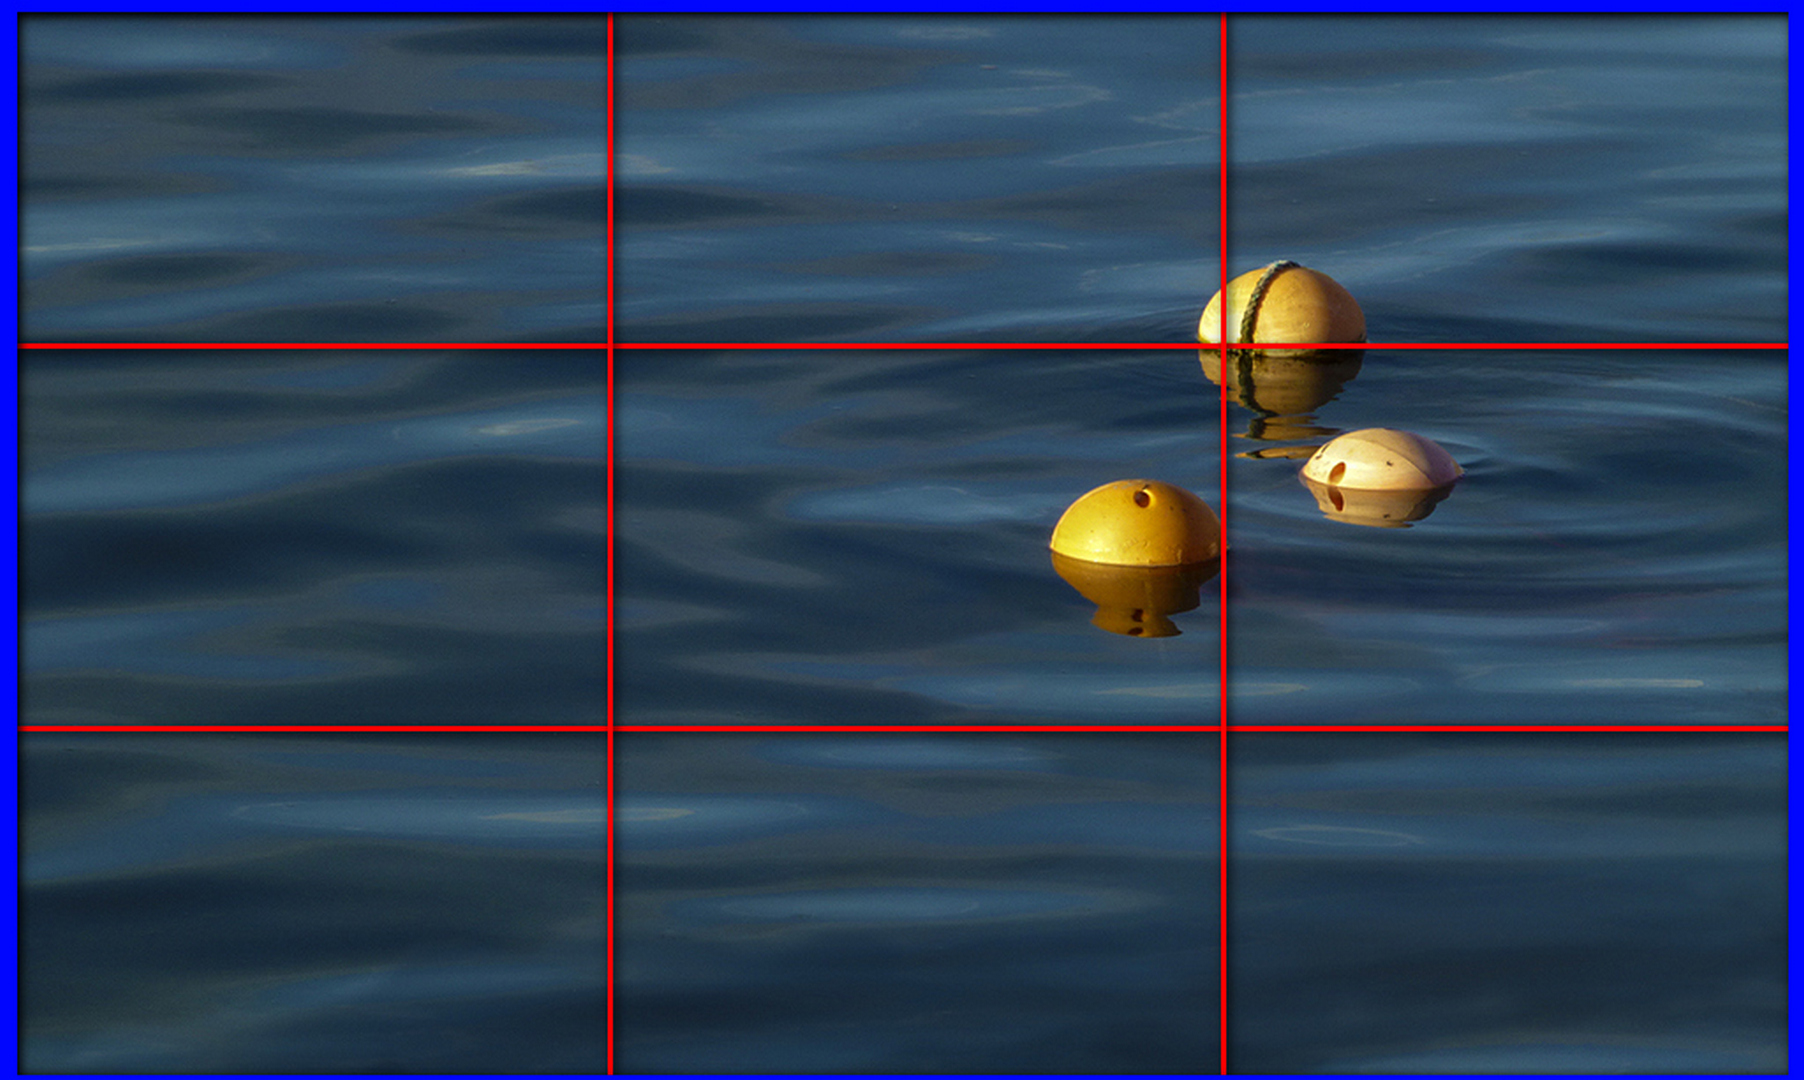
An example displaying several elements of composition in the one simple shot. Dividing the photo into 9 imaginary pieces using the red lines (the rule of thirds), we can see the objects of interest lie near where the red lines intersect, thus applying the rule of thirds.
In the above photo, the rule of thirds dominates, three not two is used (sometimes referred to "as the rule of odds"), and colour contrast not color harmony is used. A simple shot combining some of my "often used" elements of composition. The red lines are the imaginary lines drawn on top of the image for "the rule of thirds".
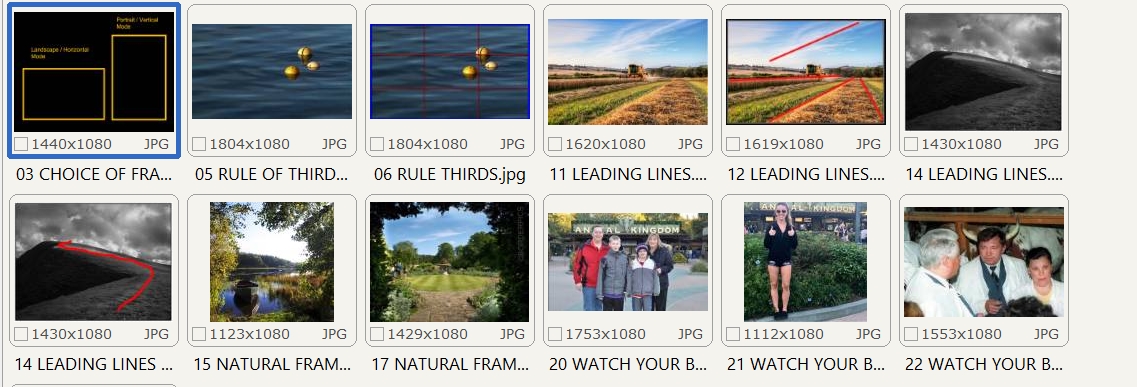
Basic composition examples perhaps more suited to the 'beginner'. How we frame the subject has some bearing on the compositional quality of the photograph, you should know the correct way to hold your camera too, especially when shooting in 'vertical' or 'portrait mode'. As far as the rule of thirds goes, were told its better to place an object of interest near to where the imaginary lines intersect, this makes for a 'better' composition. Leading lines' can 'lead' the eye into/around a photograph and help promote depth to a two dimensional medium. Natural framing could consist of bushes, branches or trees used to form a kind of natural frame to a subject, so is often a good technique to adopt. Oh, and always check your background, make sure no branches, trees or poles appear to be 'growing' out of a subjects head, also we should try and avoid a distracting or confusing (or amusing) background!
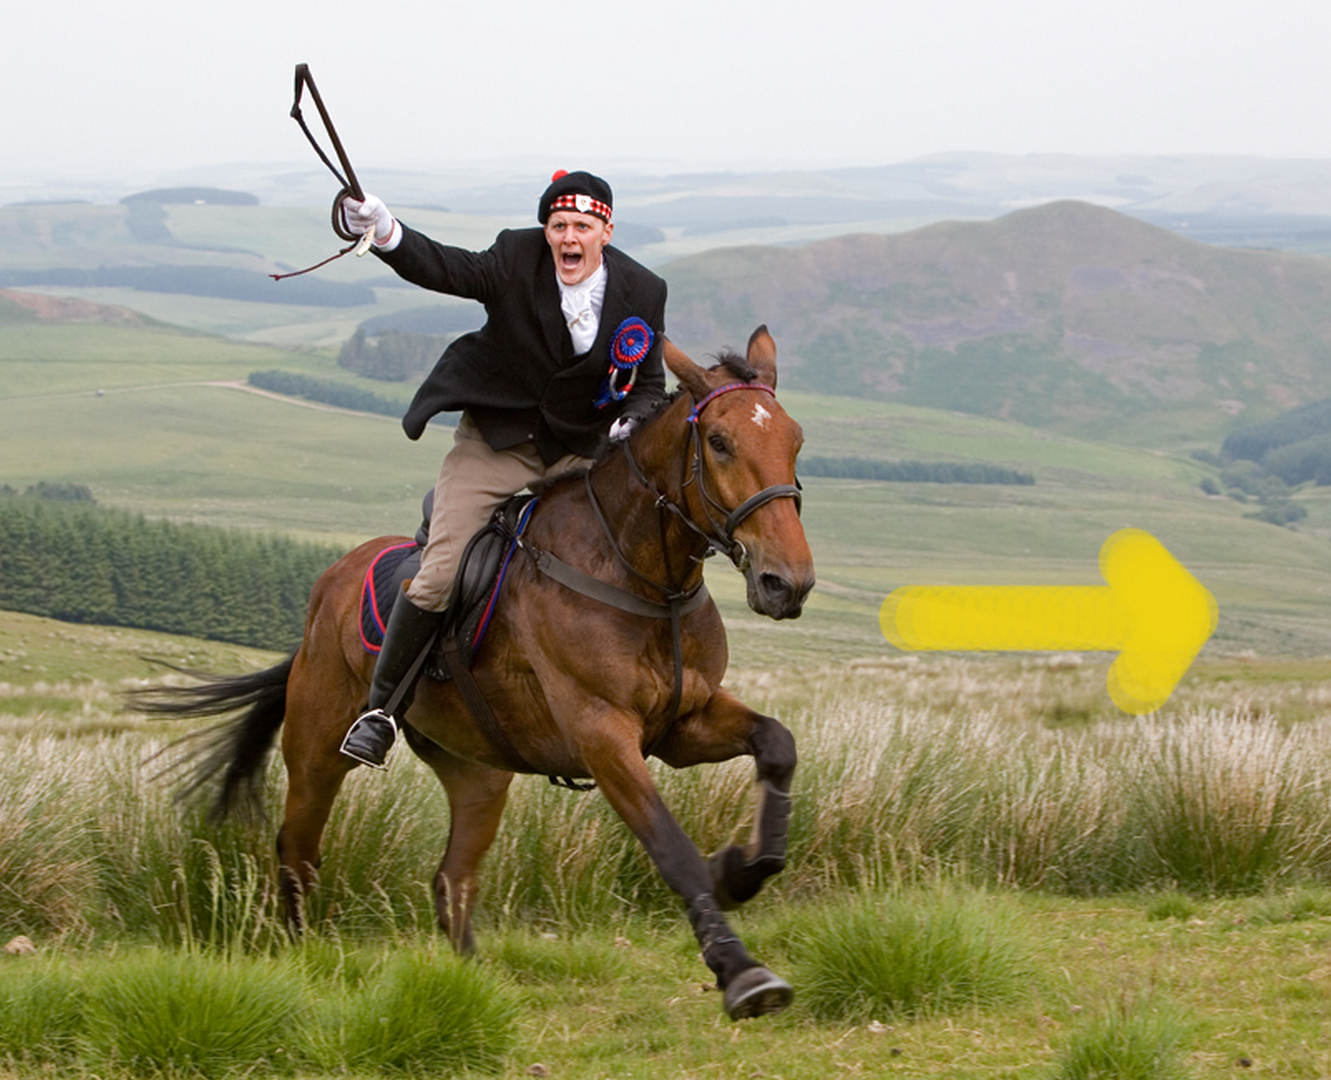
An example of giving an object space to move into. Leave more room on the one side for the moving object to move into although this is not always possible. Depth of field is not so important here as the mist has diffused the background a bit. A slightly slower shutter speed could have brought movement to the legs of the horse and this could have improved the photograph in my opinion. I was more concerned about getting the shot as you only get the one chance and the Callant was galloping, panning was used. Begger's can't be . . .
TOP TIP To take a succesful panning shot, prefocus on where you think you will actually take the photograph as was done for this photograph. That way, you increase the chance of the subject being sharp. I was running a website called Borderpics at the time, I offered framing and mounting as partof the service. I was able to print, mount and frame a 12 x 10" photo and present it to the Callant that same afternoon. OK, so I gave it away free of charge but it was a very good example of marketing that brought me future business.
TOP TIP Basic and simple tips on improving composition once applied, can bring great improvements to your photographs. Learn the simple compositional elements before considering more complicated compositional tips that are seldom used anyway. Basic composition really is the secret whether using a phone or a camera.
TOP TIP, remember, in it's simplest form, good photography often boils down to location/subject and lighting. Two things. Ensure your lighting is adding to your photo, is it the best time of day, best season of the year, is it worth re-visiting or setting up again at a different time? Consider one of these apps that show you the angle of the sun or moon, most useful.
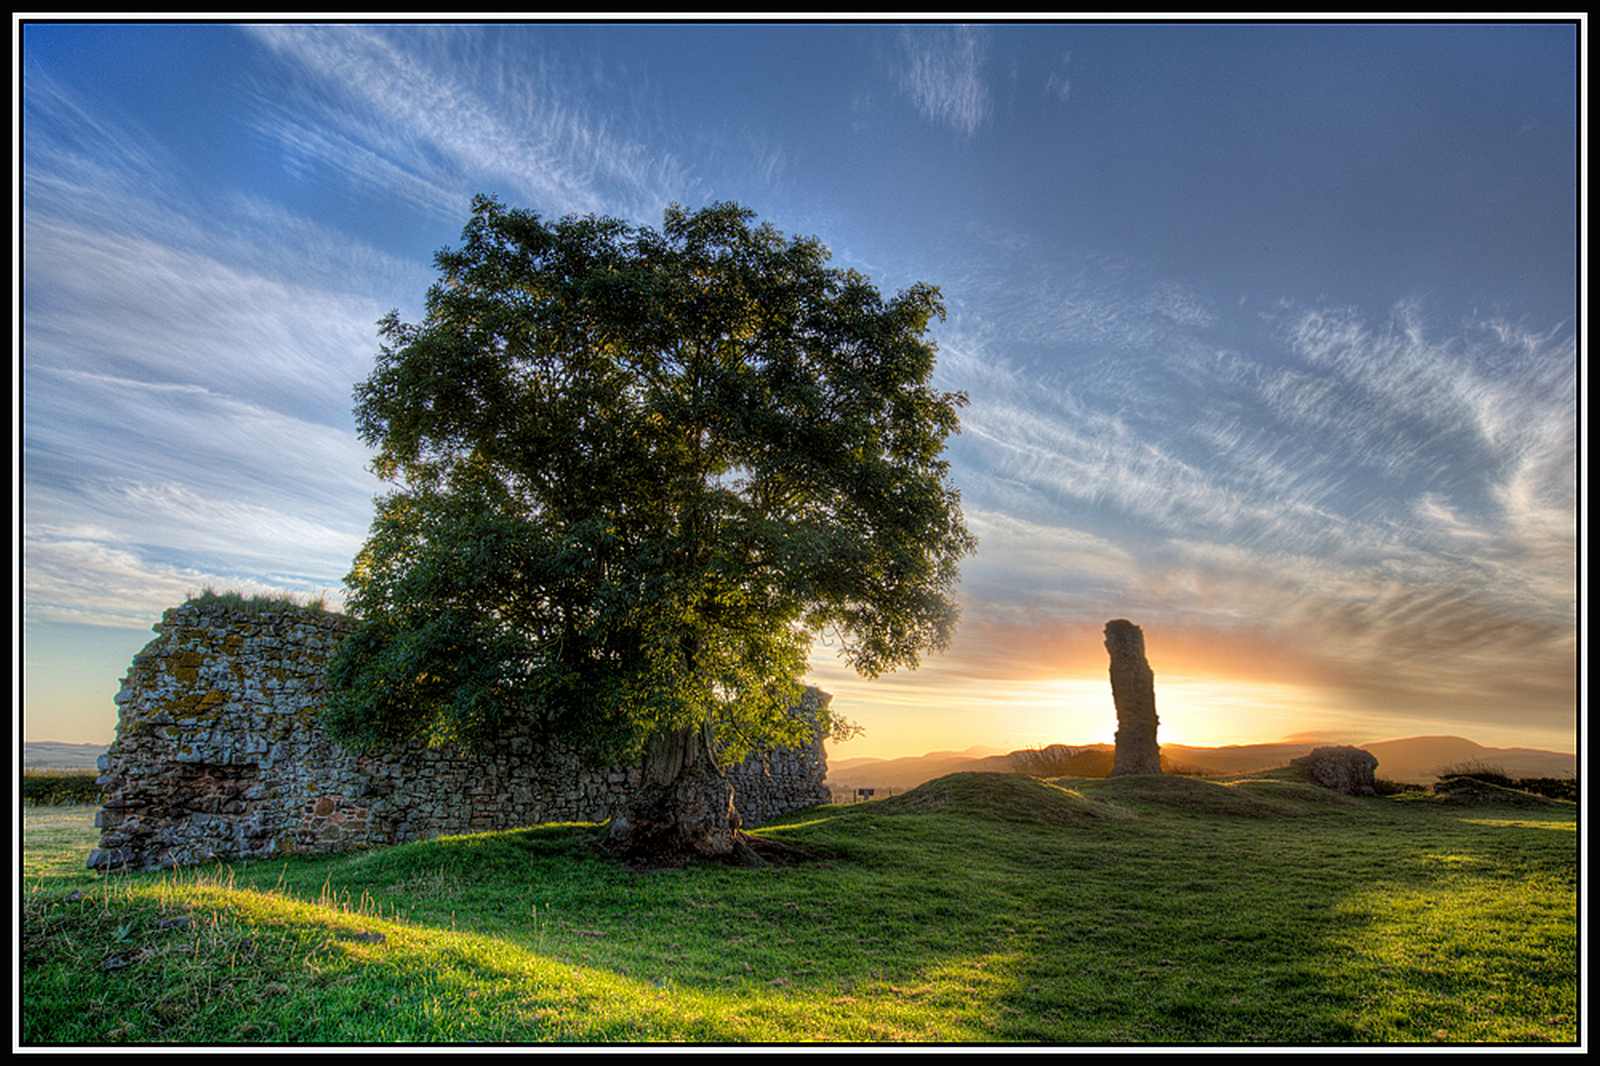
Cessford Castle in the Scottish Borders, early morning sunshine. The low, directional lighting, helps the form and texture of the photograph. HDR, my EB method and burning / dodging also add to the effectiveness of this photograph. There is a 'burning / dodging' link that explains things in a bit more detail. (see under 'B') Burning and Dodging can make or break a photograph. It's like the finishing touches of an artists brush and if carefully applied, can transform an ordiary photograph into a good photograph. The borders can be easily added later using FASTSTONE, a superb FREE bit of software that I now prefer to use for the bulk of my basic editing.
SOME ELEMENTS OF COMPOSITION
Composition has many techniques, not limited to the following list which is roughly in order of complexity. Items 05 through 35 are easy tweaks for the beginner to improve composition, also consider 40 through 60, more beginner tweaks. Composition is a vast subject. Look up these elements of composition on the Internet fore more information and examples. Use ETOILE and try and include the basics if possible. Remember, good photography boils down to LOCATION and LIGHTING. Go somewhere or choose something original, ensure the lighting is good lighting, not just sufficient to take a photograph. You might have to consider re-visiting on a different time of day, season of the year etc. Yes it's hard work and effort is required, especially if you want to improve your photography. If perhaps you don't want to apply the effort needed, consider something like knitting, much more relaxing.
05 FORMAT/FRAME/PORTRAIT/LANDSCAPE
07 CHOICE OF VIEWPOINT/GET UP HIGH/GET DOWN LOW
10 CHOICE OF LENS/PERSPECTIVE/WIDE ANGLE/STANDARD/TELEPHOTO
15 CROPPING/GET IN CLOSE/FILL THE FRAME
20 LEADING LINES/THEY MAY NOT ALWAYS BE STRAIGHT
25 RULE OF THIRDS/SWITCH ON IF AVAILABLE
30 GIVING A MOVING OBJECT SPACE TO MOVE INTO
35 WATCH YOUR BACKGROUND/OBJECTS/BRANCHES/TWIGS/POLES ETC.
40 PATTERN/SHAPES/REPETITION ETC.
42 BRACKET YOUR SHOTS
45 CONTRAST
50 COLOUR HARMONY/COLOUR CONTRAST
55 SYMMETRY
60 LAYERS
65 SCALE/INCLUDE AN OBJECT WE RECOGNISE TO GIVE A SENSE OF SCALE
70 BALANCE YOUR IMAGE/USE POSITION AND MASS
75 ODD NUMBERS ARE VISUALLY PLEASING/CHOOSE 1, 3, 0R 5 OF SOMETHING
80 USE TONAL CONTRAST
82 FILL THE FOREGROUND WITH DETAIL
84 USE DEPTH OF FIELD TO YOUR ADVANTAGE/ISOLATE YOUR SUBJECT
86 USE SHUTTER-SPEED TO CONTROL THE DEGREE OF MOTION BLUR
88 USE A TRIPOD/HELPS WITH FRAMING/ GIVES ACCESS TO FULL RANGE OF APERTURES/SHUTTER-SPEEDS
90 BURNING OR DODGING/IMPROVE YOUR PRESENTATION
92 REMEMBER - F.A.C.E./E.T.O.I.L.E.
94 USE THE E.B. (EXTREME BRACKETING) METHOD AND H.D.R.
96 CONSIDER THE FIBONACCI SPIRAL (GOOGLE IF NECESSARY)
97 EDIT YOUR WORK/BRIGHTNESS/CONTRAST/CLONING/VIGNETTE/BORDERS/SHARPENING ETC
I have not covered every item on the list which I pinched from one of my talks on composition. Perhaps through time you can try some more aspects of composition. Please be aware that there are many more elements of composition not listed. Remember, Composition is King.
WHAT IS DEPTH OF FIELD (DOF)?
Depth of Field, or DOF, can be thought of as 'The depth or area within an image from front to back that is in focus'. What does this really mean to a novice? There are many explanations on DOF, but don't worry about it for now. Concentrate on getting a high enough shutter-speed to help ensure a sharp photograph. If you own a smartphone, its already designed to use a higher than average ISO, a faster shutter speed than normal, and a good DOF, even at maximum aperture. Use your phone if you are worried about DOF.
RELATIONSHIP OF APERTURE AND DEPTH OF FIELD
Until I update this, please google aperture priority / depth of field.
RELATIONSHIP OF SHUTTER-SPEED AND MOTION BLUR
Until I update this, please google shutter-speed / motion blur.
I have pushed composition above everything else. Composition is king. Analysing the way the eye (or my eye) travels, is an important part of the learning process for beginners. Lets look at how my eye travels in some of my photographs. This may help you understand a bit more about composition.
COMPOSITION - HOW THE EYE TRAVELS
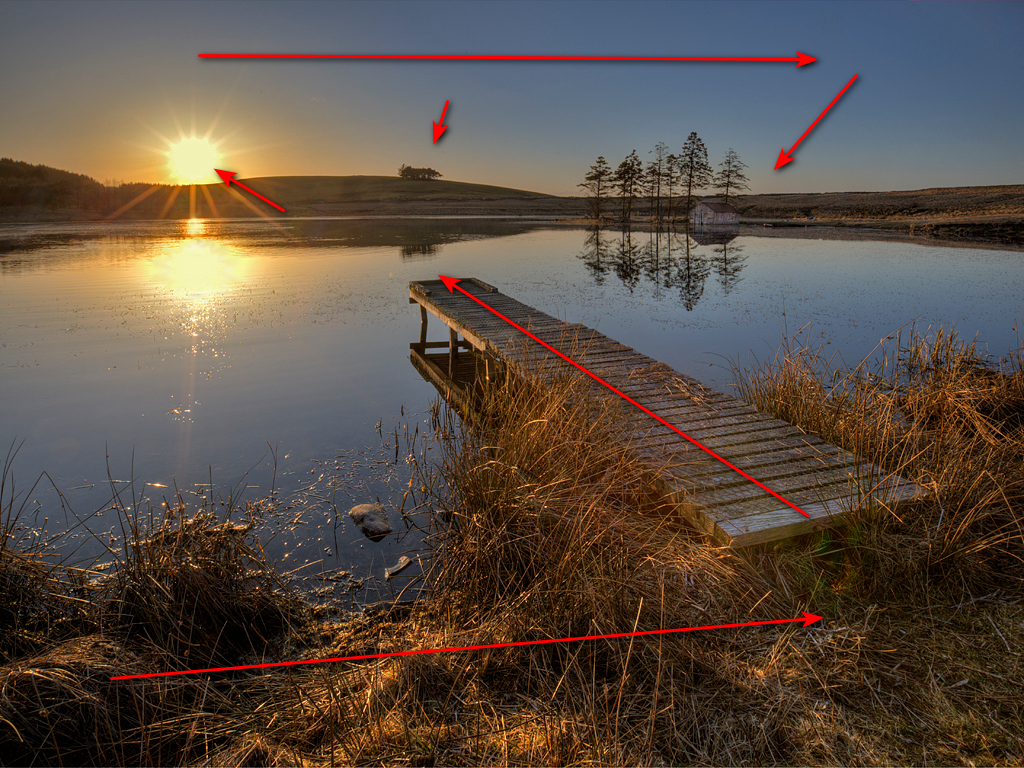
Synton Loch on the Hawick to Selkirk road. Thanks go to a Hawick chap called Sel, good location.
1. Good foreground detail, broken up and highlighted by dappled lighting which is low and angular.
2. A good leadin from the left to the wooden platform that points to the sun.
3. Detail in the sun and reflection, slightly starburst effect by stopping down (selecting a small aperture) the lens.
4. The eye then goes to the right, with the horizon broken up and made more interesting by the clump of trees and the trees around the boat house.
5. The eye then tends to go in this circular shape taking in the photo.
6. Please note the time of day, and the low setting sun. A contre-jour (against the light) photograph. Many of my succesful photographs are contre-jour, requiring my Extreme Bracketing method, check out the E-page.
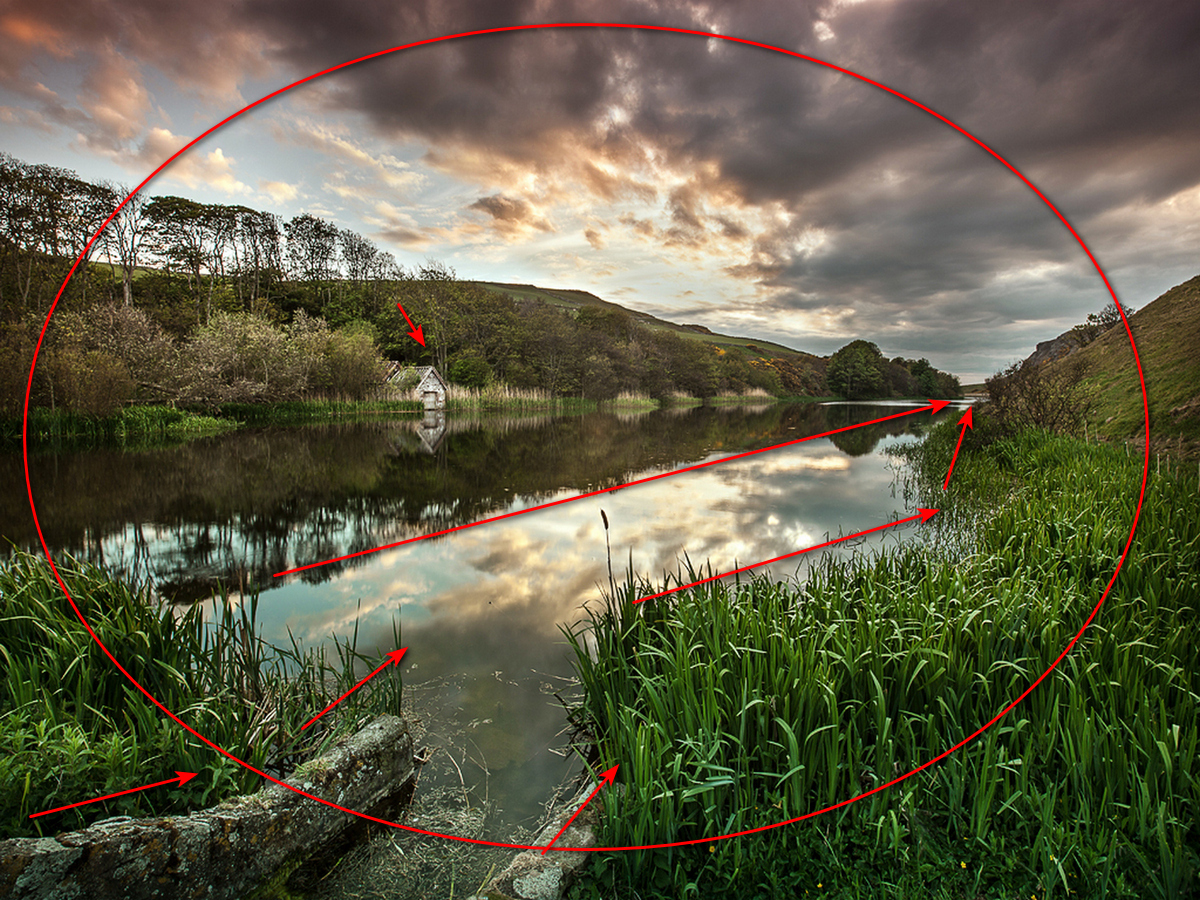
Quit possibly one of the best photographs of Mire Loch, near St. Abbs. I have checked the Internet, and nothing comes close. The more I study this photograph, the more I like it. Its contra-jour, shooting into the light coming from the brightest part of the sky. Theres no sun but a glorious sky full of details reflected into the mirror-like loch. It was taken on a 5D MK11, a tripod and cable release used. It's high resolution, makes a beatiful print like a painting with detail in the sky - a cracker. I have this as a large 4' x 3' canvas on my wall and its one of the few photos that you feel you could walk into.
1. A fairly dull day, rescued by HDR and my Extreme Bracketing technique to retain detail in the brightest bits of the sky that were reflected in the Loch.
2. A good leadin from the bottom of the photo to the distant viewpoint. The concrete edges of the sluice structure takes the eye into the photograph.
3. Your eye then follows the loch and the edges of the green rushes to the distance. The one foreground dark coloured rush sticking up, breaks the relections nicely.
4. The eye picks up the old boat shed adding a point of interest.
5. Leading Lines (the sluice walls, the river, the banks) feature heavily in the success of this photo as does the carefully selected viewpoint selected by moving around with the camera at my eye before placing it on the tripod with cable release.
6. A subtle vignetting was applied to all 4 corners to help retain the eye. PAINT.NET (check P - Page) has a superb vignetting feature that I use a lot now.
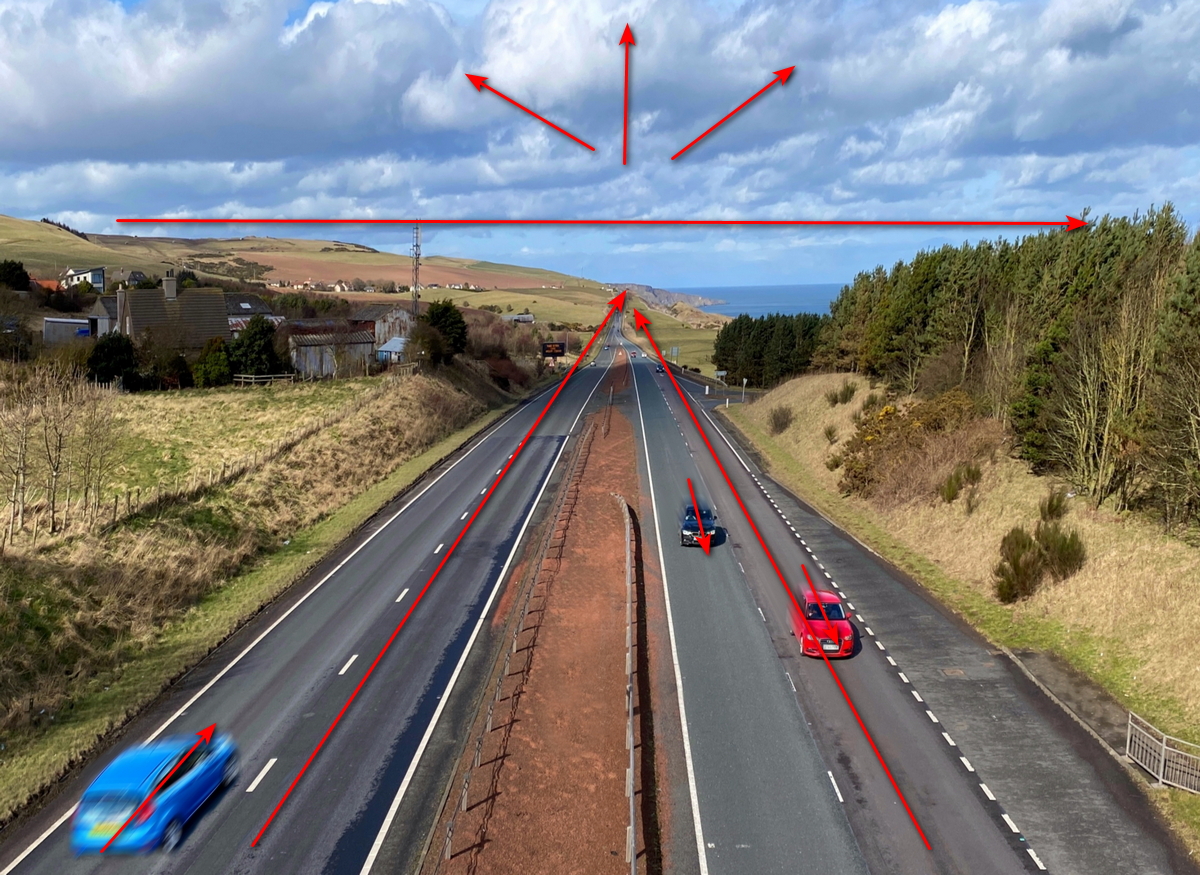
1. Taken with a Smart phone. Taken from the bridge on a good day when the sky was detailed and interesting.
2. The balance was about 2/3 land to about 1/3 sky, not 50/50.
3. The blur on the cars was done with PAINT.NET and added after the main photo. I'll show you under PAINT.NET how to do this. I've tried ND filters, manually controlled slow-shutter speeds, panning etc., all too messy and complicated on a phone, especially with just one hand/arm that works.
4. Leading Lines, or receeding lines add to the feel of depth in this photo. I'ts quite simple but effective.
Basically, for good composition, your photograph should help retain your eye within the photo, lead your eye around the critical parts of your photo, and often the simpler the better.